|
Danish Pastries:
In a
large bowl combine the flour, yeast, sugar, and malt powder. Then stir in the salt. With your
fingertips work the butter into the dry ingredients until the butter is in small
pieces and coated with flour. Make a well in the center of the dry ingredients and pour in the water
and milk. With a bench scraper or wooden spoon, gradually work the flour into the liquid, making sure
that the dry ingredients are moistened. Then using your hands, work
the dough for a minute or two to make sure all the dry ingredients are
thoroughly moistened. At this point the dough will be a sticky mass. Cover the bowl loosely
with plastic wrap and let it ferment for about one hour (helps to develop flavor
and aroma) at room temperature (75 - 78 degrees F) (24 - 26 degrees C) .
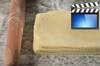
After an hour transfer the
dough to a lightly floured surface and press or roll the dough into a 14 x 10
inch (35 x 25 cm) rectangle. Transfer to a lightly floured baking sheet, sprinkle the top of
the dough lightly with flour, cover with plastic wrap, and place in the
refrigerator for at least six hours (or overnight).
About 15 minutes before you
want to laminate the dough, take a
sheet of parchment paper and draw a 10 x 7 inch (25 x 18 cm) rectangle on the paper. Flip the
paper over. Take your cold butter and cut it into six pieces. Place the cold
butter within the drawn lines on your parchment paper and enclose it in the
parchment. With your rolling pin pound the cold butter to soften it a little.
Then fold the parchment paper to make a 10 x 7 inch rectangle (like an envelope) and roll the
butter until it fits this size. Make sure the butter is of even thickness. At
this point you want the butter to be cold but still pliable. It needs to be at
the same temperature as the dough. If it's too soft then place in the
refrigerator for about 15 minutes.
Rolling out the dough
(lamination): The temperature of the
dough is important when rolling it out. It is best that your kitchen is cool.
However, I have found you can cool your countertop by running an ice pack over
the surface before rolling.
Remove the sheet of dough and
your butter from the refrigerator. Peel off the parchment paper from the butter
and place the butter onto the center of your dough. Wrap the edges of the dough over the
butter so they meet in the center. Press lightly to seal the edges. (The edges
of the dough and the butter should be even.)
First Turn: Transfer the
dough to a lightly floured surface with the sealed edges running vertical. With
your rolling pin gently tap the dough and then roll the dough vertically into a
22 x 8 inch (55 x 20 cm) rectangle. Lift the dough frequently as you roll so the dough
doesn't stick. Flour as necessary. Roll end to end, not side to side, making sure the dough is of
even thickness. When it's at the correct length and width, fold the dough
lengthwise into thirds, like you're folding a letter. Make sure the edges of the
dough are straight and even. You now have your first turn.
Second Turn: Rotate the
dough 90 degrees so the folded edge is on your left (like the binding of a
book). Repeat the process of rolling your dough to 22 x 8 inches (55 x 20 cm) and fold the
dough again into thirds. This is now your second turn. Place the dough on a
lightly floured baking sheet, lightly flour the top of the dough, cover with plastic wrap, and place in the
refrigerator to chill one hour. (This is done to both chill the dough and to
relax the dough after the rolling.)
Third Turn: Take the
chilled dough and repeat the rolling and folding into thirds one more time. This
is your third turn. Again, place your dough on a floured baking sheet, flour the
top of the dough, cover, and
refrigerate one hour.
Sheeting: On a lightly floured
surface roll your dough into a 16 x 9 inch (40 x 23 cm) rectangle. Again, place
on a lightly floured baking sheet, lightly flour the top, cover, and refrigerate
one hour (at this point the dough can be stored overnight in the
refrigerator.)
Shaping the Danish:
Line two baking sheets with parchment paper. On a lightly floured surface roll
your dough into a 24 x 9 inch (61 x 23 cm) rectangle. Make sure to lift the
dough frequently so it doesn't stick and this also allows the dough to shrink
back. Then trim the long edges of the dough with a sharp knife or pizza wheel.
Then cut the dough into 4 inch (10 cm) squares. You will end up with 12 - 4 inch (10
cm) squares.
Work with one square of dough at a
time. For a pinwheel shaped Danish, using a sharp knife or pizza wheel, cut four
- 2 - 2 1/4 inch (5 - 5.5 cm) slits starting at each corner and cutting towards
the center. Do not cut all the way through the center. (So what you have is four triangles
within the square.) Then take the right tip of each triangle and fold it into
the center. Press the tips into the center to seal. Place on your baking sheet
and repeat with the remaining squares.
In a small bowl whisk the egg
with the egg yolks. Using a pastry brush, lightly brush the tops of
each Danish. This prevents the Danish from drying out during proofing. Place each baking sheet in a large plastic bag and let proof for
about 1 1/2 to 2 hours at room temperature (75 - 78 degrees F) (24 - 26 degrees C). You
know the Danish are proofed when they are puffed and soft to the touch.
Preheat your oven to 400
degrees (200 degrees C). Place your oven racks in the upper and lower thirds of
your oven.
Once proofed, gently press down
the centers of the Danish to make an indentation. Fill with about 1 tablespoon
of raspberry jam (can use other flavors of jam). Then gently brush the tops of
the Danish with
the egg wash. This will help with browning. Place the two baking sheets of
Danish in the preheated oven
and bake 10 minutes. Rotate your baking sheet top to bottom and front to back.
Reduce your oven temperature to 375 degrees F (190 degrees C) and bake for an
additional 8 minutes or until golden brown and firm to the touch.
Remove from oven and place on a
wire rack to cool. Danish are best the day they're made.
Makes
about 12 Danish Pastries.
View comments on this recipe on YouTube
|