26 Years of Award Winning Baking & Dessert Video Recipes

breakfast & brunch bars & squares cupcakes shortbreads breads youtube channel
about us
recipe index
substitutions
ingredients
glossary
conversions
weight vs volume
easter baking
apple recipes
pumpkin recipes
cranberry recipes
chocolate recipes
healthy baking
eggless recipes
comfort foods
blueberry recipes
biscotti recipes
pudding recipes
english tea party
trifle recipes
ice cream recipes
strawberry recipes
lemon recipes
thanksgiving baking
candy recipes
halloween baking
valentine's baking
christmas cookies
christmas baking
christmas candy
baking history
bibliography

 
Subscribe Now
 

Red Velvet Whoopie Pies Recipe & Video

Printer Friendly Page

Pin It

We knew it would happen. With the widespread popularity of the Red Velvet Cake and the renewed interest in Whoopie Pies, it was inevitable that the two would join to give us the Red Velvet Whoopie Pie. And there is no denying how good these look and taste. Each cookie takes two round, domed shaped chocolate cookies and sandwiches them together with a soft and tangy cream cheese filling. The contrast of a red cookie with a white filling is both a visual and tasty delight. I like to finish the look with a few squiggles of white frosting on the tops of each Red Velvet Whoopie Pie. 

Red Velvet Whoopie Pies have a mild chocolate flavor which comes from adding a small amount of cocoa powder (regular unsweetened or Dutch-processed) to the batter. This batter also contains buttermilk which gives the Whoopie Pies a moist and tender crumb. If you are not familiar with buttermilk it has a nice thick creamy texture with a rich tangy buttery taste that makes baked goods tender. You can buy buttermilk, or buttermilk powder, or you can make your own by adding 1 tablespoon of white distilled vinegar, cider vinegar, or lemon juice to 1 cup (240 ml) of milk. Let this mixture stand 5 to 10 minutes before using. Although they say that the reaction between cocoa powder and baking soda gives a red tinge to the batter, we still need some liquid red food dye, and quite a lot (1 tablespoon), to get that unmistakably "red" color that we tie to all things called Red Velvet. Now, the actual hue of red will depend on whether you use a Dutch-processed cocoa powder or just regular unsweetened cocoa powder. (I have used a Dutch-processed cocoa powder.)

Lastly, the Cream Cheese Filling is simply a beaten mixture of butter, cream cheese, vanilla extract, and confectioners (powdered or icing) sugar. You can use a small ice cream scoop or a spatula to spread the filling. If you want to decorate the tops of the Whoopie Pies, simply take a little of the filling and thin it out to piping consistency with a little cream or milk. Then place the filling in a piping bag or small plastic bag and pipe lines on the tops of the Red Velvet Whoopie Pies.

Related Recipes You May Like

Pumpkin Whoopie Pies

Whoopie Pies

Peppermint Whoopie Pies

Pumpkin Ice Cream Sandwiches

Chocolate Marshmallow Cupcakes

Red Velvet Cupcakes

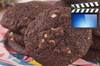
Red Velvet Whoopie Pies: Preheat oven to 375 degrees F (190 degrees C) and place oven rack in the center of the oven. Line two baking sheets with parchment paper.

In a large bowl sift together the flour, cocoa powder, baking powder, baking soda, and salt.

In the bowl of your electric mixer, fitted with the paddle attachment (can also use a hand mixer), beat the butter and sugars until light and fluffy. Add the egg beating well. Beat in the vanilla extract. In a small measuring cup, mix the buttermilk and red food coloring. With the mixer on low speed, alternately add the flour mixture and buttermilk mixture, in three additions, beginning and ending with the flour. Drop heaping tablespoons (can also use a small ice cream scoop) of the batter onto the prepared baking sheets, spacing about 2 inches (5 cm) apart. With moistened fingers or with the back of a spoon, smooth the tops of the cookies.
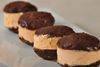
Bake for about 9-10 minutes or until the tops of the cookies, when lightly pressed, spring back (or a toothpick inserted into the center of a cookie comes out clean). Remove from oven and transfer to a wire rack to cool completely.

Cream Cheese Filling: Beat the butter until smooth and creamy. Add the cream cheese and beat until smooth. Beat in the vanilla extract. With the mixer on low speed, gradually beat in the confectioners' sugar, and continue to beat until smooth and creamy.
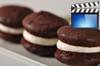
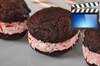
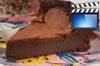
To Assemble: Take one cookie and spread a heaping tablespoon of the filling on the flat side of the cookie. Top with another cookie. 
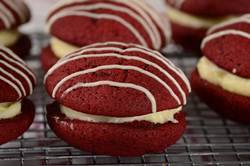
If desired, take a little of the filling and thin it out, to piping consistency, with a little milk or cream. Place in a small piping bag or plastic bag and pipe lines back and forth over the tops of the Whoopie Pies. The assembled cookies can be stored, covered, in the refrigerator for several days.

Makes about 17 sandwich cookies.

View comments on this recipe on YouTube

References:

Brachman, Wayne Harley. American Desserts. Clarkson Potter/Publishers. New York: 2003.

Lewis, Matt & Poliafito, Renato. Baked Explorations. Stewart, Tabori & Chang. New York: 2010.

Red Velvet Whoopie Pies:

2 1/4 cups (295 grams) all purpose flour

1/4 cup (30 grams) Dutch-processed cocoa powder (can use regular unsweetened)

1/2 teaspoon baking powder

1/2 teaspoon baking soda

1/4 teaspoon salt

3/4 cup (170 grams) unsalted butter, room temperature

1 cup (200 grams) granulated white sugar

1 large egg, room temperature

1 teaspoon pure vanilla extract

3/4 cup (180 ml) buttermilk

1 tablespoon liquid red food coloring

Cream Cheese Filling:

1/2 cup (113 grams) unsalted butter, room temperature

1 - 8 ounce (227 grams) cream cheese, room temperature

3 cups (345 grams) confectioners' (powdered or icing) sugar, sifted

1 teaspoon pure vanilla extract

Subscribe Now


New Videos


Contact Us   Privacy Policy

Use of materials on all pages on the domains Joyofbaking.com, joyofbaking.mobi, the Joyofbaking.com Facebook Page, @joyofbaking on Twitter, the Joyofbaking.com RSS Feed, the Joyofbaking.com email list the Joyofbaking1 YouTube Channel and any emails sent from @joyofbaking.com are entirely at the risk of the user and their owner, iFood Media LLC will not be responsible for any damages directly or indirectly resulting from the use.

References cited may include a link to purchase the referenced book or item on Amazon.com. Joyofbaking.com receives a commission on any purchases resulting from these links.

This website and the contents are not endorsed or sponsored by the owner of the "Joy of Cooking" series of books or its publisher Simon & Schuster, Inc. and is not related to the  "Joy the Baker" books and website. Video icons by Asher.

Content in any form may not be copied or used without written permission of Stephanie Jaworski, Joyofbaking.com.  Students and non profit educators may use content without permission with proper credit. 

A baking resource on the Internet since 1997

Copyright  1997 to 2023 iFood Media LLC