27 Years of Award Winning Baking & Dessert Video Recipes

breakfast & brunch bars & squares cupcakes shortbreads breads youtube channel
about us
recipe index
substitutions
ingredients
glossary
conversions
weight vs volume
apple recipes
pumpkin recipes
cranberry recipes
chocolate recipes
healthy baking
eggless recipes
comfort foods
blueberry recipes
biscotti recipes
pudding recipes
english tea party
trifle recipes
ice cream recipes
strawberry recipes
lemon recipes
thanksgiving baking
candy recipes
halloween baking
valentine's baking
christmas cookies
christmas baking
christmas candy
easter baking
baking history
bibliography

 
Subscribe Now
 

Light Wheat Sandwich Bread Recipe & Video

Printer Friendly Page

When I make a sandwich, or pop a couple of slices of bread into the toaster, more often than not,  this is the bread I use. It is a cross between a White Sandwich Bread and a 100% Whole Wheat Bread, as it contains both bread flour and whole wheat flour. I like its billowy loaf shape and its lovely golden brown crust. This bread has a soft and fluffy texture with a mild whole wheat flavor. 


A few notes on technique and ingredients. First, to make this bread a little more flavorful, I add a pre-ferment. That is, a starter. Which is simply a small amount of bread dough that is made the night before and then stored in the refrigerator overnight so it develops flavor. Next morning, when you make the bread dough you just add the starter along with all the other ingredients. This bread dough is kneaded for quite a long time which produces a strong dough that cleans your mixing bowl, and is smooth, elastic, and just a little sticky. If you're new to bread making, I would watch the video as I show you an easy way (the 'window' test) to determine if your dough has been fully kneaded.

As far as ingredients go, we are using unbleached bread flour and whole wheat flour. For the yeast, I like to use SAF Red Instant Yeast. This type of yeast gives a good rise and it doesn't need to be proofed. However, if you want to substitute active dry yeast for instant yeast you need to increase the amount of yeast by about 20%. You also need to activate the yeast in warm water. To do this, remove about 1/4 cup (60 grams) water from the total amount called for in the recipe and heat it to lukewarm. Stir in the yeast. Let stand about 5-10 minutes or until the mixture becomes frothy. Dried milk powder is used in this recipe as it enhances the color of the crust, adds flavor, and helps to keep the bread moist. For the salt I like to use kosher salt. There is also some butter in this dough, and I like to use unsalted butter. And lastly we need water. I like to use icy cold filtered water. The temperature of the water is very important when making bread as it determines the temperature of the final dough, which affects the rate (time) of fermentation (proofing). The reason we use cold water is that the dough warms up during the long kneading period.

Related Recipes You May Like

White Sandwich Bread

Multi Grain Bread

Brioche Recipe

French Baguettes

No Knead White Bread

Soft Dinner Rolls

Pre-Ferment: In a medium sized bowl stir the flour with the yeast and salt. Make a well in the center of the dry ingredients and pour in the water. With a plastic scraper or wooden spoon, work the flour into the liquid, until all the flour has been moistened.

Then lightly oil a medium sized bowl. Place the dough into the bowl and flip it over so the top of the dough has a light coating of oil. Cover with plastic wrap and let it sit (ferment) at room temperature for one hour. Then place in the refrigerator overnight (about 12 hours).

Light Wheat Sandwich Bread: In a large bowl, stir the flours with the yeast, salt, sugar, and dried milk powder. Remove the Pre-ferment from the refrigerator and cut it into small chunks. Pour the cold water into the bowl of your electric mixer, fitted with the dough hook. Then add the Pre-ferment and the flour mixture. Knead the dough on 1st speed for five minutes. Increase your mixer speed to 2nd speed and continue to knead the dough for about 4-6 minutes or until the dough cleans the bowl and is smooth, elastic, and not very sticky. Add the butter and continue to knead the dough, on 2nd speed, for another 3-4 minutes or until the dough cleans the bowl and is smooth and elastic and a little sticky.

Place your dough in a large bowl that has been lightly oiled. Turn the dough once so the top of the dough has a light coating of oil (this prevents a crust from forming on the top of the dough). Cover with plastic wrap and let rise at room temperature (about 75 degree F) (24 degree C) until doubled in size (approximately 2 hours).

You will need a 8 1/2 x 4 1/2 x 3 inch (21.5 x 11.5 x 10 cm) loaf pan. Lightly grease the pan with a flavorless oil or spray with a non stick vegetable spray.

Turn out your dough onto a lightly floured surface. You want the top of the dough to now be on the bottom. Lightly flour the top of your dough and with the palms of your hands flatten the dough slightly to break any large air bubbles. Form the dough into a rectangle. Take the short edge of the rectangle and fold the dough lengthwise into thirds, like you're folding a letter. Make sure the edges of the dough are straight and even. Next, we need to shape the dough into a log shape. Take the top edge of the dough and fold it into the center and seal. Again, take the top edge of the dough and fold it over to the edge of the dough and seal. (See video for demonstration.) Turn the dough so the seal is now underneath. Then with the palms of your hands, gently roll the dough back and forth until it's the length of your loaf pan. Place the log of dough into your pan, seam side down. (The dough should fill the pan about two thirds full.) Cover pan with plastic wrap that has been lightly oiled, or spray with a non stick vegetable spray, and let proof at room temperature for 1 - 1 1/2 hours or until the dough rises about 1 inch (2.5 cm) above the rim of your loaf pan. (If you lightly press into the dough, your finger will leave a slight indentation.) (If the dough starts to mushroom over the sides of the pan bake immediately.)

Meanwhile preheat your oven to 350 degree F (180 degree C).

When your bread is ready to bake, remove the plastic wrap and bake for about 35 - 45 minutes or until your bread is golden brown. About halfway through baking turn your pan front to back to promote even baking. If you tap the bread it will sound hollow. Remove from oven and place on a wire rack to cool for a couple of minutes. (Using a probe thermometer the internal temperature of the bread should read between 195 - 200 F (91 - 93 C). Then remove the bread from the pan, placing the bread top side up on a wire rack. If a soft crust is desired, brush the top of the bread with melted butter. Let cool completely before serving. This bread can be stored in an airtight bag for about three days or it can be frozen for a couple of months.
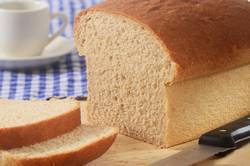
Makes 1 loaf of Light Wheat Sandwich Bread.

View comments on this recipe on YouTube

Pre-Ferment (Starter):

1 cup minus 1 tablespoon (120 grams) unbleached bread flour

1/4 teaspoon SAF Red Instant Yeast Available on Amazon #ad

1/2 teaspoon (2 grams) kosher salt

1/3 cup (80 ml/grams) cold filtered water

Light Wheat Sandwich Bread:

1 3/4 cups (225 grams) unbleached bread flour

1 1/4 cups (165 grams) whole wheat flour

1 teaspoon (4 grams) SAF Red or Gold instant yeast Available on Amazon #ad

2 teaspoons (8 grams) kosher salt

1 1/2 tablespoons (20 grams) light brown sugar

Scant 1/4 cup (20 grams) dried milk powder

1 cup (240 ml/grams) icy cold filtered water

3 tablespoons (42 grams) unsalted butter, at room temperature

Subscribe Now


New Videos


Contact Us   Privacy Policy

Use of materials on all pages on the domains Joyofbaking.com, the Joyofbaking.com Facebook Page, the Joyofbaking1 YouTube Channel and any emails sent from @joyofbaking.com are entirely at the risk of the user and their owner, iFood Media LLC will not be responsible for any damages directly or indirectly resulting from the use.

References cited may include a link to purchase the referenced book or item on Amazon.com. Joyofbaking.com receives a commission on any purchases resulting from these links.

This website and the contents are not endorsed or sponsored by the owner of the "Joy of Cooking" series of books or its publisher Simon & Schuster, Inc. and is not related to the  "Joy the Baker" books and website. Video icons by Asher.

Content in any form may not be copied or used without written permission of Stephanie Jaworski, Joyofbaking.com.  Students and non profit educators may use content without permission with proper credit. 

A baking resource on the Internet since 1997

Copyright  1997 to 2024 iFood Media LLC