26 Years of Award Winning Baking & Dessert Video Recipes

breakfast & brunch bars & squares cupcakes shortbreads breads youtube channel
about us
recipe index
substitutions
ingredients
glossary
conversions
weight vs volume
easter baking
apple recipes
pumpkin recipes
cranberry recipes
chocolate recipes
healthy baking
eggless recipes
comfort foods
blueberry recipes
biscotti recipes
pudding recipes
english tea party
trifle recipes
ice cream recipes
strawberry recipes
lemon recipes
thanksgiving baking
candy recipes
halloween baking
valentine's baking
christmas cookies
christmas baking
christmas candy
baking history
bibliography

 
Subscribe Now
 

Sprinkle Cake Recipe & Video

Printer Friendly Page

Before 1989 candy sprinkles were used mainly for decorating the tops of cakes and cookies. But everything changed when Pillsbury came out with their Funfetti Cake Mix that instructed you to fold the candy sprinkles directly into the cake batter. It was a great idea and people liked it so much that they started to add sprinkles to all kinds of batters, from cakes to cookies, to pancakes and fudge. Since I prefer to make cakes from scratch, I decided to make a homemade version of a Sprinkle Cake. I used a tender and moist White Butter Cake to which I added some rainbow colored candy sprinkles. I really like how the cake looks with its colorful dots of bright and cheery colors. Since butter cakes tend to be a little sweet I decided to sandwich the two layers together with a layer of homemade raspberry jam and then a tangy sweet cream cheese frosting. The frosting is also used to cover the entire cake. Of course, more sprinkles are needed to decorate the cake. The amount I will leave up to you.

This White Butter Cake recipe is made using the 'combination' method' of mixing. This method is similar to the 'creaming' method. The only difference being that the eggs are first separated, and while the egg yolks are added to the beaten butter and sugar mixture, the egg whites are beaten separately and are then folded into the batter. You will find that this produces a cake that has good volume with a light texture. Cake flour, instead of all purpose flour, is used as it produces a cake with a soft and tender crumb. You can make your own cake flour by combining all purpose flour with cornstarch. To make 1 1/2 cups cake flour, take 1 1/2 cups all purpose flour and remove 3 tablespoons of the flour and replace it with 3 tablespoons cornstarch. If measuring by weight combine 155 grams of all purpose flour (plain flour) with 25 grams of cornstarch.

You can fill and frost the cake layers once they have been baked and cooled. However, the problem is that freshly baked cakes are very soft and fragile so when you try to spread the frosting there is a tendency for the cakes to tear. So I like to first cover and refrigerate the cakes until firm (this will take several hours or even overnight). This extra step makes the spreading of the frosting so much easier. 

Related Recipes You May Like

Raspberry Jam

Yellow Butter Cake

Simple Vanilla Cake

Orange Chiffon Cake

Vanilla Cake

White Cupcakes

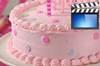
Sprinkle Cake: Preheat your oven to 350 degrees F (180 degrees C) and place the oven rack in the center of the oven. Butter and flour two - 8 inch (20 cm) round cake pans. Line the bottoms of the pans with parchment paper.

Separate your eggs while they are still cold, placing the yolks in one bowl and the whites in another bowl. Cover the two bowls with plastic wrap and allow the eggs to come to room temperature before using (about 30 minutes).

In a bowl, sift the flour with the baking powder and salt.

In the bowl of your electric stand mixer, fitted with the paddle attachment (or with a hand mixer), beat the butter until soft. Add 3/4 cup (150 grams) of the sugar and beat until light and fluffy (about 3 minutes). Add the egg yolks and vanilla extract and beat until combined. Scrape down the sides and bottom of the bowl as needed.

With the mixer on low speed, alternately add the flour mixture (in three additions) and the milk (in two additions), beginning and ending with the flour.  

In a clean bowl of your electric stand mixer, fitted with the whisk attachment (or with a hand mixer), beat the egg whites until foamy. Add the cream of tartar and continue beating until soft peaks form. Gradually add the remaining 1/4 cup (50 grams) of sugar and continue to beat (on high speed) until shiny medium firm peaks form. With a rubber spatula gently fold a little of the whites into the batter to lighten it, and then fold in the remaining whites (in two additions) until combined. Do not over mix the batter or it will deflate. 
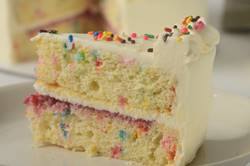
Gently fold in the sprinkles.

Divide the batter evenly between the two prepared pans (about 355 grams of batter in each pan) and smooth the tops with an offset spatula or the back of a spoon. Bake in the preheated oven for 20 minutes, or until a toothpick inserted in the center of the cake comes out just clean (the cakes will spring back if lightly touched in their centers and you will notice that the cakes are just starting to pull away from the sides of the pan).
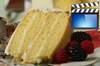
Cool the cakes in their pans on a wire rack for about 10 minutes. Then place a wire rack on top of each cake pan and invert, lifting off the pan and gently peeling off the parchment paper. Re-invert each cake onto a greased wire rack. Once the cakes have completely cooled, wrap in plastic wrap and place the cake layers in the refrigerator until firm (several hours or even overnight). (This is done to make the filling and frosting of the cakes easier.)

Cream Cheese Frosting: In your electric stand mixer, fitted with the paddle attachment (or with a hand mixer), beat the butter and cream cheese until smooth. Add the confectioners' sugar and vanilla extract and beat until well combined. Scrape down the sides and bottom of the bowl as needed. Then continue to beat on high speed until the frosting is light and fluffy.

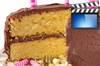
Assemble: Place one of the cake layers onto your cake turntable or serving 
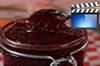
platter, with the top of the cake facing down. Spread the jam on the cake layer. Next, spread about 1 cup (240 ml) of the frosting on top of the jam. Place the next cake layer, top of the cake facing down, onto the filling. Spread the remaining frosting over the top and sides of the cake. If you like you can pipe a border around the outside edge of the cake. (I used a small star tip, Wilton #96.) Garnish the top of the cake with more rainbow sprinkles. You can cover and refrigerate the cake for 2 to 3 days. Bring to room temperature before eating.

Serves about 10 - 12 people.

View comments on this recipe on YouTube

White Butter Cake:

2 large eggs

1 1/2 cups (180 grams) cake flour

2 teaspoons (8 grams) baking powder

1/4 teaspoon (1 gram) salt

1/2 cup (113 grams) unsalted butter, at room temperature

1 cup (200 grams) granulated white sugar, divided

1 teaspoon (4 grams) pure vanilla extract

1/2 cup (120 ml/grams) milk, at room temperature

1/8 teaspoon cream of tartar

3 tablespoons (40 grams) rainbow candy sprinkles

Filling:

1/4 cup (70 grams) raspberry jam or preserves (homemade or store bought)

Cream Cheese Frosting:

3/4 cup (170 grams) butter, at room temperature

8 ounces (225 grams) full fat (original) cream cheese, at room temperature

2 1/2 cups (300 grams) confectioners' (icing or powdered) sugar, sifted

1 teaspoon (4 grams) pure vanilla extract

Garnish:

Rainbow Candy Sprinkles

Note:  Cream of tartar is used when whipping egg whites to stabilize them, and to prevent over beating and the whites from drying out.


Subscribe Now


New Videos


Contact Us   Privacy Policy

Use of materials on all pages on the domains Joyofbaking.com, joyofbaking.mobi, the Joyofbaking.com Facebook Page, @joyofbaking on Twitter, the Joyofbaking.com RSS Feed, the Joyofbaking.com email list the Joyofbaking1 YouTube Channel and any emails sent from @joyofbaking.com are entirely at the risk of the user and their owner, iFood Media LLC will not be responsible for any damages directly or indirectly resulting from the use.

References cited may include a link to purchase the referenced book or item on Amazon.com. Joyofbaking.com receives a commission on any purchases resulting from these links.

This website and the contents are not endorsed or sponsored by the owner of the "Joy of Cooking" series of books or its publisher Simon & Schuster, Inc. and is not related to the  "Joy the Baker" books and website. Video icons by Asher.

Content in any form may not be copied or used without written permission of Stephanie Jaworski, Joyofbaking.com.  Students and non profit educators may use content without permission with proper credit. 

A baking resource on the Internet since 1997

Copyright  1997 to 2023 iFood Media LLC