26 Years of Award Winning Baking & Dessert Video Recipes

breakfast & brunch bars & squares cupcakes shortbreads breads youtube channel
about us
recipe index
substitutions
ingredients
glossary
conversions
weight vs volume
easter baking
apple recipes
pumpkin recipes
cranberry recipes
chocolate recipes
healthy baking
eggless recipes
comfort foods
blueberry recipes
biscotti recipes
pudding recipes
english tea party
trifle recipes
ice cream recipes
strawberry recipes
lemon recipes
thanksgiving baking
candy recipes
halloween baking
valentine's baking
christmas cookies
christmas baking
christmas candy
baking history
bibliography

 
Subscribe Now
 

Cherry Pie Recipe & Video

Printer Friendly Page

You can make a Cherry Pie using either sweet or tart cherries or even a combination of the two. You can also make a Cherry Pie with fresh, canned, or even bottled cherries. For me, the type of cherries I use depends on the season. During the summer months, I like to use either sweet or sour fresh cherries. But in the dead of winter, when fresh cherries are nowhere to be found, I use either canned or bottled sweet or sour cherries. And the great part is no matter the cherries, this Cherry Pie is delicious. You can serve it warm, at room temperature, or even cold, with or without a scoop of vanilla ice cream.  


Just as you can use different types of cherries to make a Cherry Pie, you can also use different types of pastry crusts. If you have a personal favorite, by all means use it instead of this pie crust recipe. This crust is known as Pate Brisee, which is a short crust pastry. Pate Brisee is a combination of butter and flour with a little salt and sugar added for flavor. Water binds all the ingredients together and you end up with a pastry that has a wonderful buttery flavor and crumbly texture. I have chosen a top crust that is in the form of pastry stars (you could use other shapes of cookie cutters) which makes for a very festive pie, especially at your next 4th of July celebration. If you prefer, though, you could use a lattice crust (like this Strawberry Rhubarb Pie) or you could simply have just a round of pastry (like this Apple Pie) with a few slits cut into the pastry.

As I mentioned above, there are two types of cherries that can be used to make a Cherry Pie, sweet or sour, with many varieties within each classification. The type of cherry used will affect how much sugar is added to the cherry filling. I find that sour cherries need the full amount of sugar given in the recipe, whereas a little less sugar is needed for sweet cherries. Be sure to taste and adjust the amount of sugar. What I will say if you are using fresh cherries, either sweet or sour, is that they should be pitted. And the easiest way to pit cherries is to buy a cherry pitter, a very inexpensive and effective tool. Along with the cherries and sugar, the filling has a little tapioca to thicken the cherry juices, salt to bring out the cherry's flavor, a little vanilla extract and Kirsch (cherry liqueur) for flavor, and lemon juice (to prevent the cherries from turning brown). Once baked, let the pie cool on a wire rack for at least an hour before cutting so the fruit juices have time to be absorbed back into the cherries.

Related Recipes You May Like

Cherry Clafoutis

Cherry Squares

Blueberry Pie

Berry Pancake

Angel Food Cake, Chocolate

No Bake Cheesecake

Pie Crust:  In a food processor, place the flour, salt, and sugar and process until combined. Add the butter and process until the mixture resembles coarse meal (about 15 seconds). Pour 1/4 cup (60 ml) water in a slow, steady stream, through the feed tube until the dough just holds together when pinched. If necessary, add more water. 

Turn the dough onto your work surface and gather into a ball. Divide the dough in half, flattening each half into a disk. Then cover with plastic wrap and refrigerate for about one hour or until firm. This will chill the butter and relax the gluten in the flour. 

After the dough has chilled sufficiently, remove one portion of the dough from the fridge and place it on a lightly floured surface. Roll the pastry into a 12 inch (30 cm) circle. (To prevent the pastry from sticking to the counter and to ensure uniform thickness, keep lifting up and turning the pastry a quarter turn as you roll (always roll from the center of the pastry outwards).) Fold 
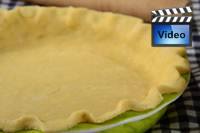
the dough in half and gently transfer to a 9 inch (23 cm) pie pan. Brush off any excess flour and tuck the overhanging pastry under itself, crimping as desired. Refrigerate the pastry, covered with plastic wrap, while you roll out the remaining pastry and make the cherry filling.

Meanwhile, remove the second round of pastry and roll it into a 12 inch (30 cm) circle. Using a 2 1/2 inch (6 cm) star cookie cutter, cut out about 20 stars. Place the stars on a parchment paper-lined baking sheet, cover with plastic wrap, and place in the refrigerator. 

Preheat your oven to 425 degrees F (220 degrees C) and place the oven rack in the lower third of the oven. 

Make the Cherry Filling: Place the cherries in a large bowl. Add the sugar, tapioca, salt, lemon juice, vanilla extract, and Kirsch or almond extract (if using) and gently toss to combine. (If using canned cherries also add the 1/3 cup (80 ml) reserved cherry juice.) Let sit for about 10-15 minutes and then pour the mixture into the prepared pie shell and dot with the 2 tablespoons (25 grams) of butter. Lightly brush the rim 
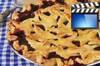
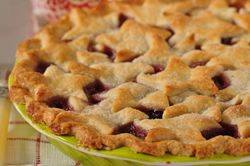
of the pastry shell with cream. Starting at the outside edge of the pie, place the cut out pastry stars in a circular pattern on top of the cherries, making sure the tips of the stars are touching. Once the top of the pie is completely covered with the pastry stars, lightly brush the entire surface with the cream. Sprinkle with a little granulated white sugar.

Place the pie on a larger baking pan, lined with parchment paper, to catch any spills. Bake the pie for about 15 minutes and then reduce the oven temperature to 350 degrees F (180 degrees C). Continue to bake the pie for about 25 - 35 minutes or until the crust is a deep golden brown color and the cherry juices are starting to bubble. If the edges of the pie are browning too much during baking, cover with a pie shield or foil ring. 

Place the baked pie on a wire rack to cool for 3-4 hours.  Serve at room temperature with softly whipped cream or vanilla ice cream. Store any leftovers for 2 - 3 days at room temperature or in the refrigerator.

Makes one 9 inch (23 cm) pie.

View comments on this recipe on YouTube

Pie Crust:

2 1/2 cups (350 grams) all-purpose flour

1 teaspoon (4 grams) salt

1 tablespoon (15 grams) granulated white sugar

1 cup (225 grams) cold unsalted butter,  cut into large chunks

1/4 to 1/2 cup (60 - 120 ml) ice cold water

Cherry Filling:

4 cups (1 liter) pitted, sweet or tart fresh cherries or 4 cups (1 liter) sweet or tart canned or bottled cherries, drained with 1/3 cup (80 ml) cherry juice reserved

3/4 cup (150 grams) granulated white sugar, or to taste

2 1/2 tablespoons (30 grams) quick cooking (Minute) tapioca

1/8 teaspoon salt

1 tablespoon freshly squeezed lemon juice

1/2 teaspoon pure vanilla extract

1/2 teaspoon Kirsch (cherry brandy) or 1/4 teaspoon pure almond extract (optional)

2 tablespoons (25 grams) butter, cut in small pieces

Glaze:

2 tablespoons cream

granulated white sugar


Subscribe Now


New Videos


Contact Us   Privacy Policy

Use of materials on all pages on the domains Joyofbaking.com, joyofbaking.mobi, the Joyofbaking.com Facebook Page, @joyofbaking on Twitter, the Joyofbaking.com RSS Feed, the Joyofbaking.com email list the Joyofbaking1 YouTube Channel and any emails sent from @joyofbaking.com are entirely at the risk of the user and their owner, iFood Media LLC will not be responsible for any damages directly or indirectly resulting from the use.

References cited may include a link to purchase the referenced book or item on Amazon.com. Joyofbaking.com receives a commission on any purchases resulting from these links.

This website and the contents are not endorsed or sponsored by the owner of the "Joy of Cooking" series of books or its publisher Simon & Schuster, Inc. and is not related to the  "Joy the Baker" books and website. Video icons by Asher.

Content in any form may not be copied or used without written permission of Stephanie Jaworski, Joyofbaking.com.  Students and non profit educators may use content without permission with proper credit. 

A baking resource on the Internet since 1997

Copyright  1997 to 2023 iFood Media LLC